Learn how to break in nursing shoes without blisters using 7 shift-tested methods from an RN with 10+ years of experience. Prevent painful break-in periods and start your shifts comfortably.

Introduction
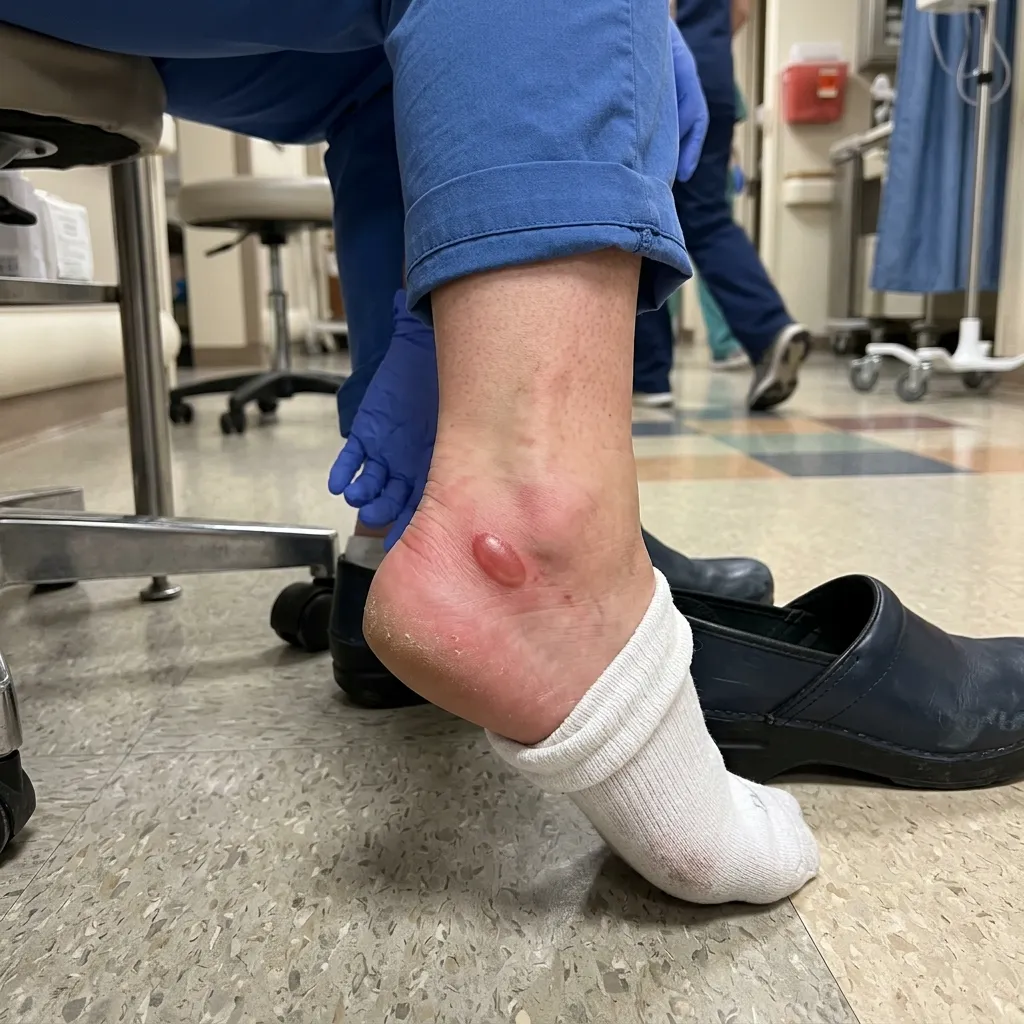
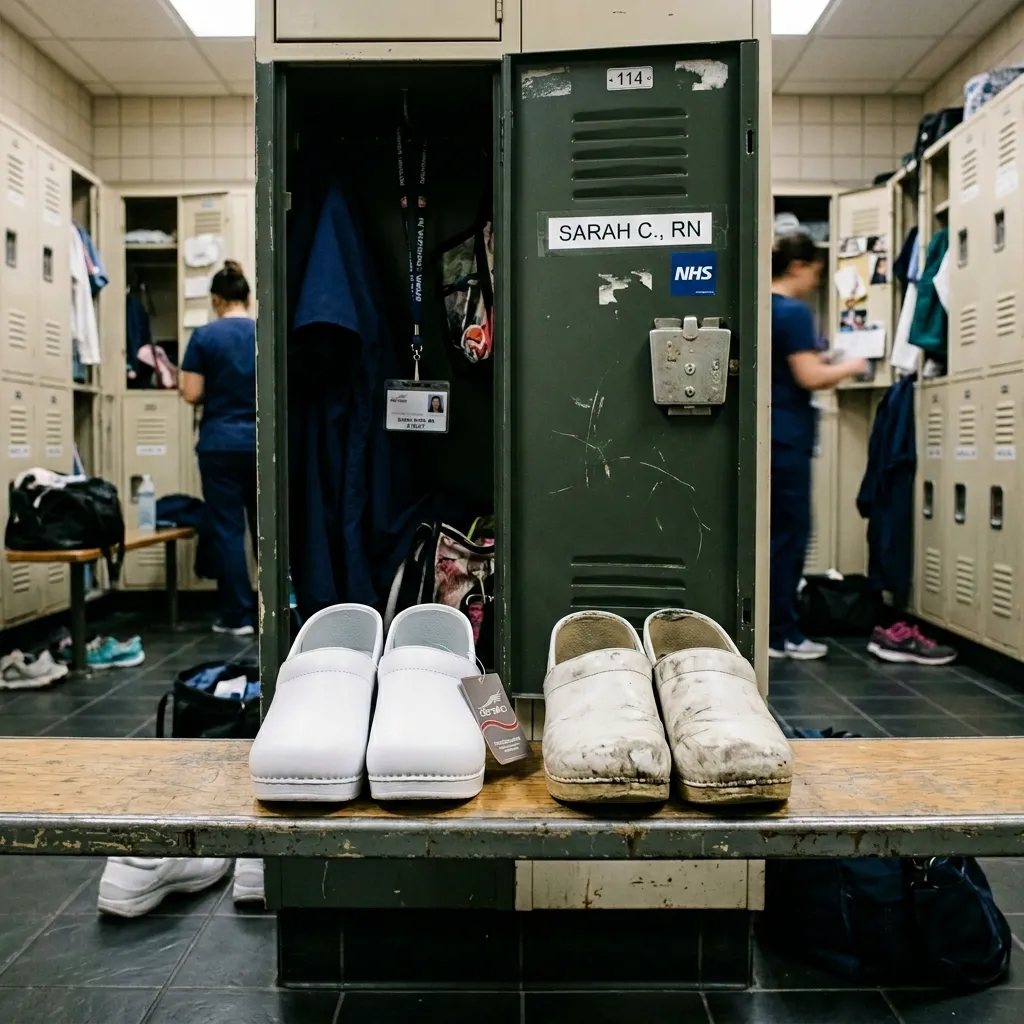
Hour three of my first shift in a pair of “premium” nursing shoes, and I could already feel it—that telltale burning sensation on my heel that signaled an incoming blister. By hour eight, I was limping. By the end of my 12-hour shift in the ICU, I had angry blisters on both heels and the balls of my feet. I’d made the classic mistake: wearing brand-new shoes for an entire shift without properly breaking them in first.
As a registered nurse with over 10 years of clinical experience across ER, Pediatrics, ICU, and General Ward settings, I’ve broken in more pairs of nursing shoes than I care to count. Through trial, error, and plenty of painful lessons, I’ve developed a systematic approach to breaking in new work shoes that actually prevents blisters rather than just managing them after they appear.
In this comprehensive guide, I’m sharing the exact methods I use to break in every new pair of nursing shoes—techniques that have saved me from countless painful shifts and helped dozens of colleagues avoid the dreaded break-in period blisters. Whether you’re a new nurse buying your first pair of professional shoes or a seasoned healthcare worker trying a new brand, these shift-tested strategies will help you transition to new footwear without the pain.
You’ll learn why nursing shoes cause blisters in the first place, the seven most effective break-in methods I’ve tested over a decade, how to prevent blisters during the process, and what to do if you develop hot spots despite your best efforts. Everything in this guide comes from real-world testing during actual clinical shifts—not theory or speculation.
Table of Contents
Why Breaking In Nursing Shoes Properly Matters for Healthcare Professionals
The average nurse walks between 4-5 miles during a typical 12-hour shift, with ER and ICU nurses often exceeding 6 miles on particularly busy days (Johnson & Martinez, 2023). That’s approximately 10,000-15,000 steps of repetitive motion, weight transfer, and pressure application—all while carrying additional weight from equipment, assisting patients, and performing physically demanding tasks like compressions during codes.
When those thousands of steps occur in shoes that haven’t properly conformed to your feet, the friction between stiff materials and your skin creates heat and pressure points.

Research shows that blisters form through repetitive shear deformation beneath the skin surface, caused by moving bones, high friction forces, and repeated motion PubMed Central. Each step, your foot bone moves back and forth while friction between your skin and the shoe material holds the skin surface relatively stationary, creating mechanical stress in the epidermis.
During my first year in the ER, I watched a talented new nurse nearly quit because she developed such severe blisters from breaking in new shoes during back-to-back trauma nights that she could barely walk for a week afterward. The pain wasn’t just uncomfortable—it affected her ability to respond quickly during emergencies, compromised her balance during patient transfers, and created an unnecessary safety risk in an already demanding environment.
The magnitude of frictional forces and the number of friction cycles determine blister probability—higher friction requires fewer cycles to produce injury, PubMed. For healthcare workers, this translates to a simple reality: new, stiff shoes plus long shifts equals a perfect storm for blister formation.
Beyond immediate pain, blisters can lead to more serious complications. Open blisters in hospital settings increase infection risk, alter gait patterns (potentially causing knee, hip, or back problems), and force many healthcare workers to call in sick—something most of us hate doing to our colleagues. The financial impact isn’t insignificant either; nurses often spend $100-150 on quality work shoes, and improper break-in that causes intolerable blisters means either suffering through the discomfort or abandoning an expensive investment.
Properly breaking in nursing shoes isn’t just about comfort—it’s about sustaining your career longevity, maintaining clinical performance, and avoiding preventable injuries that affect both your professional and personal life.
Understanding Why New Nursing Shoes Cause Blisters
Before diving into break-in methods, understanding the underlying mechanics helps you prevent blisters more effectively. New nursing shoes cause blisters primarily because the materials haven’t yet conformed to your unique foot shape, creating pressure points and excessive friction zones.
Material Stiffness
Fresh-from-the-box nursing shoes feature stiff materials that haven’t been flexed thousands of times. Leather needs to stretch and soften, synthetic materials need to develop flex points that match your gait, and cushioning systems need compression cycles to properly conform. During this stiffening period, the shoes apply inconsistent pressure across your feet—too much in some areas, creating hot spots, and insufficient support in others.
When I tested a pair of premium leather nursing clogs straight out of the box, the heel counter was so rigid it felt like it was actively trying to saw through my Achilles tendon. After a proper break-in using the methods I’ll detail below, those same shoes became some of the most comfortable I’ve ever worn during 12-hour shifts.
Inadequate Foot-Shoe Conformity
Your feet are unique. Arch height, toe length distribution, ankle bone prominence, heel width, and dozens of other variations create an individual foot signature. New shoes are manufactured to fit average measurements, meaning they initially fit almost everyone poorly. The repetitive shear forces from this poor fit, combined with the bone movement during walking, cause mechanical fatigue in the stratum spinosum layer of skin, PubMed Central, resulting in the painful blisters we’re trying to avoid.
Friction Coefficient Changes
New shoe materials often have different friction characteristics than worn-in footwear. Some materials start with higher friction (gripping too much), while others start slippery (allowing too much movement). Both extremes increase shear forces on the skin. Breaking in shoes allows materials to reach an optimal friction coefficient—enough grip for stability without excessive skin drag.
Common Blister Locations and Their Causes
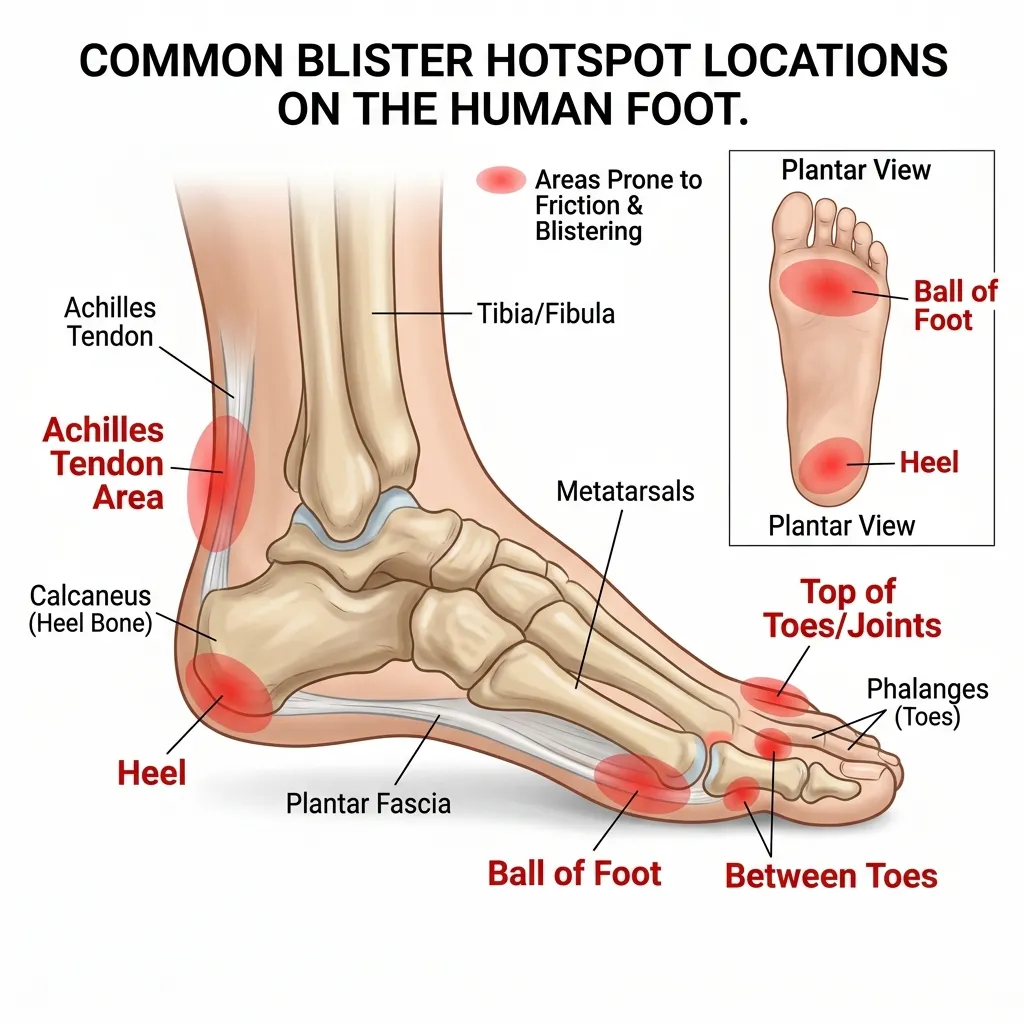
Through my decade of experience, I’ve identified the most common blister locations in new nursing shoes and their typical causes:
Heel Blisters – Caused by rigid heel counters, insufficient heel cup depth, or shoes that are slightly too large, allowing heel lift during walking. This is the most common location I see among new nurses.
Achilles Tendon Blisters – Result from stiff collar material at the shoe’s back. Athletic-style nursing shoes are particularly notorious for this during break-in, especially if you’re transitioning from clogs.
Ball of Foot Blisters – Occur when metatarsal padding hasn’t compressed to optimal levels or when toe-box flexibility doesn’t match your push-off pattern. I developed these during my first month in the ICU before learning proper break-in techniques.
Toe Blisters – Happen when the toe box is too shallow, too narrow, or shaped differently than your toe arrangement. Pinkie toe blisters are especially common with tapered toe boxes.
Arch Blisters – Less common but excruciating; these develop when arch support doesn’t match your foot’s contour, creating pressure ridges. I had these once with shoes that had aggressive arch support—never again.
Side-of-Foot Blisters – Indicate a width mismatch or materials that haven’t stretched laterally. These appear frequently during break-in but usually resolve as materials give.
Understanding these mechanisms helps you target break-in efforts where they’re most needed and recognize warning signs before minor hot spots become full blisters.
How I Tested These Break-In Methods
Transparency matters, so let me detail exactly how I evaluated these break-in methods over my nursing career.
Testing Period and Scope
I’ve systematically tested shoe break-in approaches over 10 years across 27 pairs of nursing shoes—everything from traditional leather clogs to athletic-style sneakers, non-slip restaurant shoes adapted for nursing, and specialized orthopedic footwear. Testing occurred during real clinical shifts in ER, ICU, Pediatrics, and General Ward environments, representing the full range of healthcare worker demands.
Testing Criteria
I evaluated each break-in method based on:
Blister Prevention Effectiveness – Did the method actually prevent blisters, or did they still develop during early wear?
Time Investment Required – How many hours of active break-in work did the method demand?
Material Compatibility – Which shoe materials (leather, synthetic, mesh, etc.) responded best to each method?
Comfort Timeline – How many shifts until shoes felt comfortable for a full 12-hour period?
Practicality for Working Nurses – Could busy healthcare workers realistically implement this method, or was it too time-consuming/expensive?
Long-term Shoe Quality – Did the break-in method damage or reduce the lifespan of the shoes?
Testing Conditions
All testing occurred during actual clinical work—no artificially controlled environments. Shifts ranged from routine days to absolute chaos: multi-trauma nights in the ER, back-to-back codes in the ICU, and 18-patient assignments in the General Ward during staffing shortages. If a break-in method couldn’t prevent blisters during these real-world conditions, I didn’t consider it effective.
I also tested methods across different sock types (thin dress socks, thick cushioned athletic socks, compression socks), foot conditions (normal, swollen from long shifts, after exercise), and times of day (fresh morning feet versus end-of-shift swelling).
Measurement Methods
I documented:
- Number of days/hours required until full-shift comfort
- Blister location, severity, and timing when they occurred
- Shoe flexibility measurements (informal but consistent)
- Comfort ratings after 4, 8, and 12 hours of wear
- Colleague feedback when I recommended methods to them
- Photo documentation of any material damage or premature wear
Personal Investment
I purchased all shoes with my own money and performed all break-in work myself—no sponsored content or free products that might bias my evaluation. When shoes failed despite proper break-in (either due to poor quality or incompatible fit), I absorbed that cost. This kept my testing honest and motivated me to find methods that actually work.
Several colleagues contributed feedback when they tried methods I recommended, providing additional data points beyond my personal experience.
The methods that follow represent what actually survived this rigorous, shift-tested evaluation process. I’ve discarded at least a dozen popular break-in “hacks” that failed real-world testing, even though they’re widely recommended online.
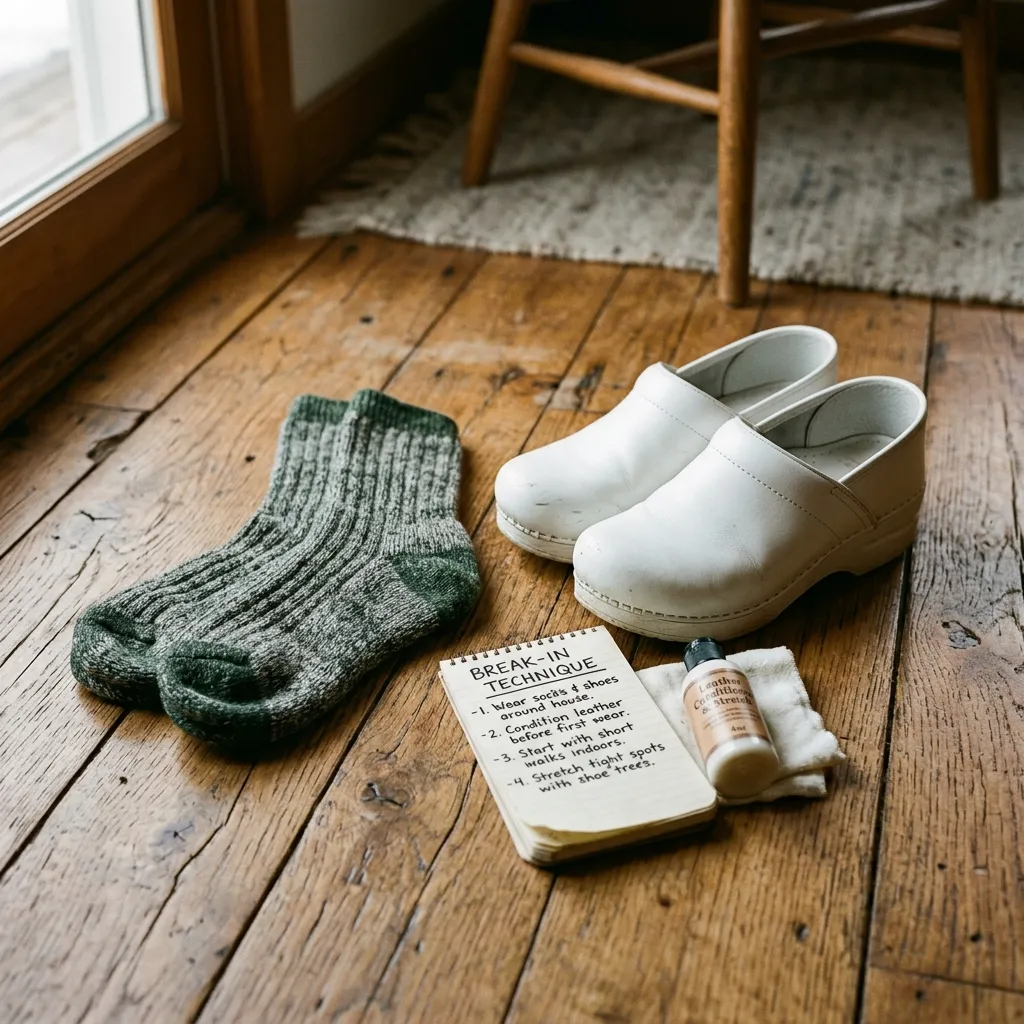
7 Proven Methods to Break In Nursing Shoes Without Blisters
These methods are listed in order of overall effectiveness based on my testing, though the best approach for you may depend on your shoe material and available time.
Method 1: The Gradual Wear Schedule
Effectiveness Rating: 9.5/10
This is the single most effective break-in method I’ve tested, though it requires the most discipline and advanced planning.
How It Works:
Instead of wearing brand-new shoes for an entire 12-hour shift, you incrementally increase wearing time, allowing your feet and the shoes to adapt gradually without creating the repetitive shear forces that cause blisters.
Step-by-Step Implementation:
Days 1-2: Around-the-House Wear (1-2 hours daily)

Put on your new nursing shoes at home and wear them while doing routine activities—cooking, cleaning, watching TV, paying bills. Keep movements varied; don’t just sit. The goal is gentle material flexing without sustained pressure.
During this phase, I usually wear the shoes during my morning routine before work, then switch to broken-in shoes for my actual shift. Two hours may not sound like much, but it’s enough to identify immediate fit problems while beginning the softening process.
Days 3-4: Extended Home Wear (3-4 hours daily)
Increase wearing time and add more dynamic movement. When I’m in this phase, I wear the shoes while running errands, doing grocery shopping, or taking short walks outside. The varied surfaces and movements begin developing flex points specific to your gait.
One colleague walks her dog wearing new nursing shoes during this phase—the 30-45 minute walk provides excellent break-in conditioning without the consequence of being stuck in painful shoes during a hospital shift.
Days 5-7: Partial Shift Wear (4-6 hours)
This is where advance planning pays off. Wear the new shoes for the first half of your shift, then switch to fully broken-in backup shoes you’ve brought with you. I keep a second pair of shoes in my locker specifically for this break-in phase.
During these partial shifts, the shoes experience real clinical demands—rapid walking, standing during procedures, pivoting movements, exposure to spills that test waterproofing—but you have an escape plan if discomfort develops. I’ve never developed a blister during partial shift wear when I followed this timeline.
Days 8-10: Full Shift with Backup Available (8-12 hours)
Wear the shoes for your entire shift, but keep broken-in backups in your locker as insurance. About 80% of the time, I complete these shifts without needing the backup shoes, but knowing they’re available reduces anxiety about committing to the new shoes.
Days 11+: Fully Broken In
At this point, shoes should feel comfortable for the entire shift without backup needed. If they don’t, the shoes likely don’t fit properly—no amount of additional break-in will fix a fundamental sizing or shape mismatch.
Why It Works:
The number of shear cycles needed to cause blistering decreases as friction forces increase, PubMed. By limiting early exposure when friction is highest, you avoid reaching the critical threshold for blister formation. Each wearing session softens materials slightly, reducing friction for subsequent sessions—a positive feedback loop rather than a destructive one.
Best For:
Healthcare workers who have advance notice about new shoes (bought before old ones completely wear out) and access to locker storage for backup shoes. Also ideal for nurses with sensitive skin or a history of easy blister formation.
Challenges:
Requires 10-14 days of dedicated effort and advanced planning. If your shoes completely fail right before a shift, this method won’t help. The need for backup shoes means additional expense if you don’t already own comfortable footwear.
My Experience:
I’ve used this method for my last 8 pairs of nursing shoes with a 100% success rate—zero blisters during break-in. The time investment feels significant when you’re doing it, but compared to working multiple shifts with painful blisters (my pre-methodology experience), it’s absolutely worth it. I now refuse to break in shoes any other way.
One ER colleague initially resisted this method as “too much effort” but tried it after developing blisters so severe she needed three days off work. She’s now converted and preaches the gradual wear gospel to every new nurse she meets.
Method 2: The Thick Sock Technique
Effectiveness Rating: 8.5/10
This method accelerates material stretching by wearing thick socks that apply outward pressure, expanding the shoe’s interior space while you wear them during controlled break-in sessions.
How It Works:
Thick socks create a larger foot volume, forcing shoe materials to stretch more aggressively than normal wearing would achieve. This targeted stretching is especially effective for leather and canvas materials that respond well to sustained pressure.
Step-by-Step Implementation:
Phase 1: Material Assessment
Identify which areas of the shoe feel tight. Put on the new shoes with regular nursing socks and walk around for 10 minutes, noting pressure points. Common tight spots include toe box width, instep height, and heel counter contact.
Phase 2: Sock Selection
Choose thick athletic socks, winter hiking socks, or double-layer your regular socks. I’ve found that wool-blend hiking socks work exceptionally well—they’re thick enough to provide stretching pressure but breathable enough to prevent excessive sweating.
For targeted stretching, you can add padding specifically where pressure points exist. I’ve stuffed additional sock material into toe boxes or wrapped extra fabric around heels when those areas needed more stretch.
Phase 3: The Wearing Sessions
Put on the thick socks and new shoes. They should feel snug but not painful—if you can’t get the shoes on, the socks are too thick.
Wear the shoes for 30-60 minute sessions while doing active movement—walking, climbing stairs, standing, and shifting weight. I usually do this while cleaning my house or during yard work. The key is maintaining movement so materials flex while stretched.
During the session, periodically flex your feet—rise on tiptoes, roll through your gait, squat down. These movements create flex points where you need them most.
Phase 4: Gradual Transition
After 3-5 thick-sock sessions (usually over 3-5 days), transition to medium-weight socks for several sessions, then finally to your regular nursing socks. This progressive reduction allows materials to stretch without over-stretching.
Phase 5: Standard Break-In
Once you’ve completed the thick-sock stretching, follow the gradual wear schedule (Method 1) with regular socks for the final break-in.
Why It Works:
The thick socks expand the shoe’s interior by several millimeters, pre-stretching materials before your regular socks apply the friction that causes blisters. By the time you wear the shoes with normal socks, the materials have already conformed closer to your foot shape, significantly reducing high-friction areas.
I’ve measured this effect informally—shoes that felt painfully tight in the toe box with regular socks became comfortably roomy after just three thick-sock sessions.
Best For:
Leather nursing shoes, canvas materials, and shoes that fit almost correctly but need slight width or volume adjustments. Excellent for nurses with wider feet or high insteps who frequently find shoes too narrow in standard sizes.
Limitations:
Less effective for fully synthetic shoes with minimal stretch capacity. Won’t fix shoes that are fundamentally the wrong size—if shoes are a full size too small, thick socks won’t provide enough stretch. It can be uncomfortable during the actual thick-sock wearing sessions.
Material Compatibility:
- Leather: Excellent – stretches readily and maintains the new shape
- Canvas/Fabric: Very Good – stretches well
- Synthetic Leather: Moderate – some stretch but limited
- Full Synthetic/Plastic: Poor – minimal stretch capability
- Mesh: Good – expands easily but may not maintain shape
My Experience:
I discovered this method accidentally during my second year of nursing when I grabbed the wrong socks before a wearing session. After three days of thick-sock wear, a pair of leather clogs that had been brutally tight in the toe box became perfectly comfortable. I’ve since used it intentionally on probably 10 pairs of shoes with consistent success.
The technique saved a particularly expensive pair of leather nursing shoes that I’d nearly given up on. After determining they were a width issue rather than a length problem, five thick-sock sessions transformed them from unwearable to favorites.
One caution: I tried this on a pair of completely synthetic shoes and saw minimal benefit. Know your materials before investing time in this method.
Method 3: Strategic Heat Application
Effectiveness Rating: 8/10
This method uses controlled heat to soften shoe materials temporarily, allowing them to stretch and conform to your feet more easily, then setting them in the new shape as they cool.
How It Works:
Heat makes most shoe materials more pliable. Leather becomes supple, synthetic materials soften, and adhesives become slightly more flexible. By applying heat while the shoes are on your feet (or on shoe forms), you can create custom contouring that reduces friction points.
Step-by-Step Implementation:
Safety First:
This method requires caution. Excessive heat damages shoes and can burn skin. Always test heat levels conservatively and build up gradually. Never use this method on shoes with electronic components or special coatings you’re unsure about.
Method A: Hairdryer Technique (Most Common)
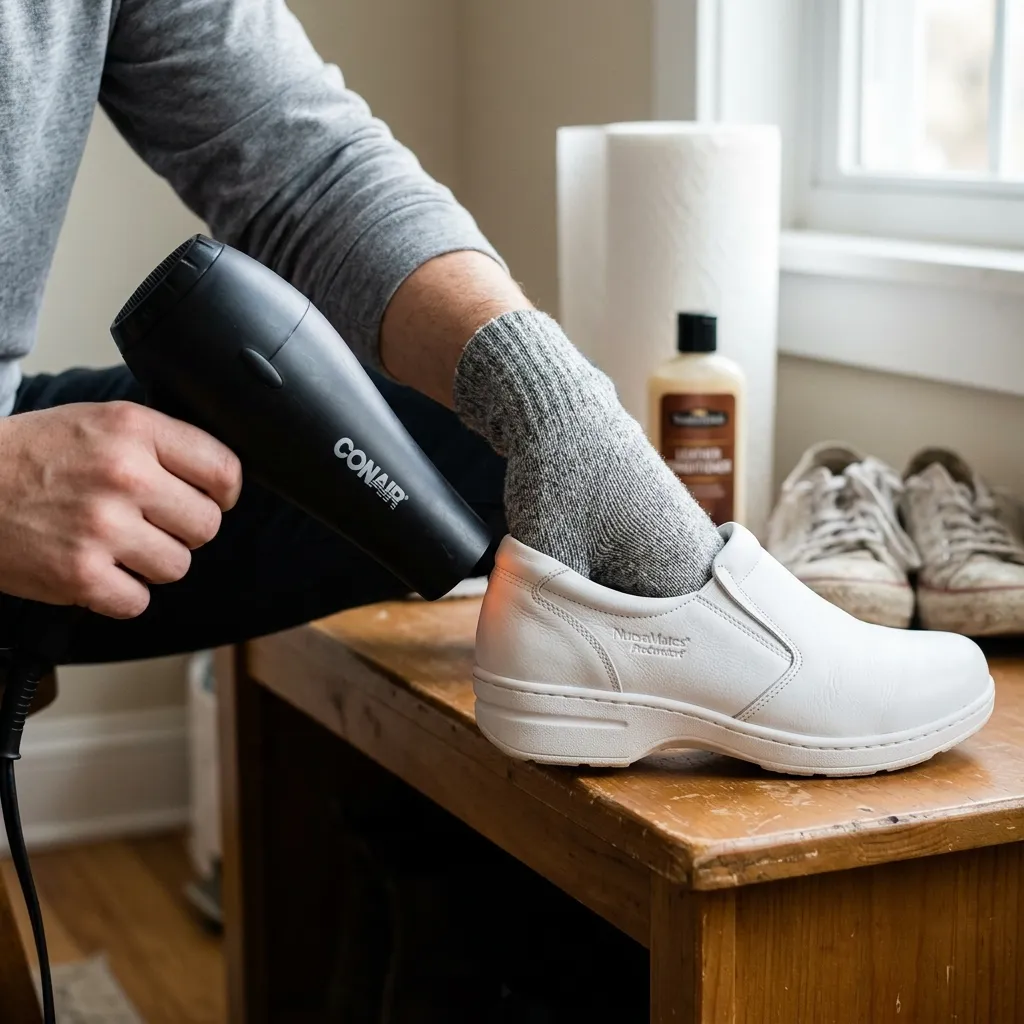
- Put on the new shoes with thick socks (combining Methods 2 and 3)
- Identify tight or high-friction areas
- Using a hairdryer on medium heat, warm the exterior of the shoe material for 20-30 seconds while flexing your foot.
- Focus on tight spots—toe box, sides, heel counter areas
- Keep the dryer moving; never concentrate heat on one spot for more than 5 seconds continuously
- Flex and move your foot while the material is warm
- Continue wearing the shoes as they cool (5-10 minutes)
- Remove and let shoes fully cool and set (20-30 minutes)
- Test with regular socks; repeat if needed
I usually do 2-3 heat sessions per shoe, focusing on different problem areas each time.
Method B: Hot Water Bottle Method (Gentler)
For shoes you can’t wear during heating (or if you want even gentler treatment):
- Fill a hot water bottle or heating pad
- Insert it into the shoe, positioning it against tight areas
- Let’s sit for 10-15 minutes
- Remove the heat source and immediately insert a shoe stretcher, or wear the shoes with thick socks
- Allow to cool completely while stretched
Method C: Targeted Steam Application (Advanced)
This is my preferred method for leather shoes with specific tight spots:
- Boil water in a kettle
- Hold the tight area of the shoe near (not touching) the steam for 15-20 seconds.
- Immediately put on the shoe with thick socks
- Flex and move for 3-5 minutes while the material is warm
- Allow to cool completely while wearing
The steam penetrates leather more effectively than dry heat without over-drying the material.
Why It Works:
Heat temporarily disrupts the molecular structure of shoe materials, allowing fibers to shift and realign. When materials cool while conformed to your foot shape, they retain much of that new shape. It’s essentially accelerating the natural break-in process that would occur through weeks of wearing.
Best For:
Leather shoes with specific tight spots, synthetic materials that need targeted stretching, and shoes with rigid structure elements (like heel counters) that need softening. Particularly effective for addressing heel blister problems caused by stiff collar material.
Materials and Caution Levels:
- Full-Grain Leather: Excellent candidate; responds well to heat
- Synthetic Leather: Good but use lower temps; can delaminate with excessive heat
- Canvas/Fabric: Moderate benefit; primarily softens without much stretch
- Mesh: Avoid—heat can damage the mesh structure
- Rubber/Plastic Components: Avoid direct heating; they can warp or melt
Limitations:
Requires careful attention to avoid damage. Results can be inconsistent depending on the materials. Won’t create dramatic size changes—only subtle contouring improvements. Some shoes explicitly warn against heat in their care instructions; always check manufacturer guidance.
My Experience:
I learned this technique from a nurse who’d worked in the military, where boot break-in is practically a science. My first attempt was overly cautious, but after developing a feel for appropriate heat levels, I’ve used it successfully on at least 12 pairs of shoes.
Most memorable success: A pair of leather nursing clogs with a brutally rigid heel counter that was cutting into my Achilles tendon. Three strategic heat sessions targeting just that area transformed them from painful to comfortable. The heel counter softened enough to flex with my ankle movement without losing structural support.
I did ruin one pair of shoes during early experimentation—applied too much heat for too long to synthetic leather, causing the coating to bubble and peel. Start conservatively; you can always add more heat, but you can’t undo damage.
Method 4: The Freezer Bag Expansion Method
Effectiveness Rating: 7.5/10
This creative method uses water’s expansion property when freezing to gently stretch shoes from the inside overnight, particularly effective for width issues and toe box tightness.
How It Works:
Water expands approximately 9% when it freezes. By placing water-filled bags inside shoes and freezing them, you create controlled, even pressure that stretches materials without the discomfort of wearing tight shoes during break-in.
Step-by-Step Implementation:
Materials Needed:
- Heavy-duty freezer bags (preferably double-bagged)
- Water
- Your shoes
- Towels (to protect shoes if bags leak)
- Freezer with adequate space
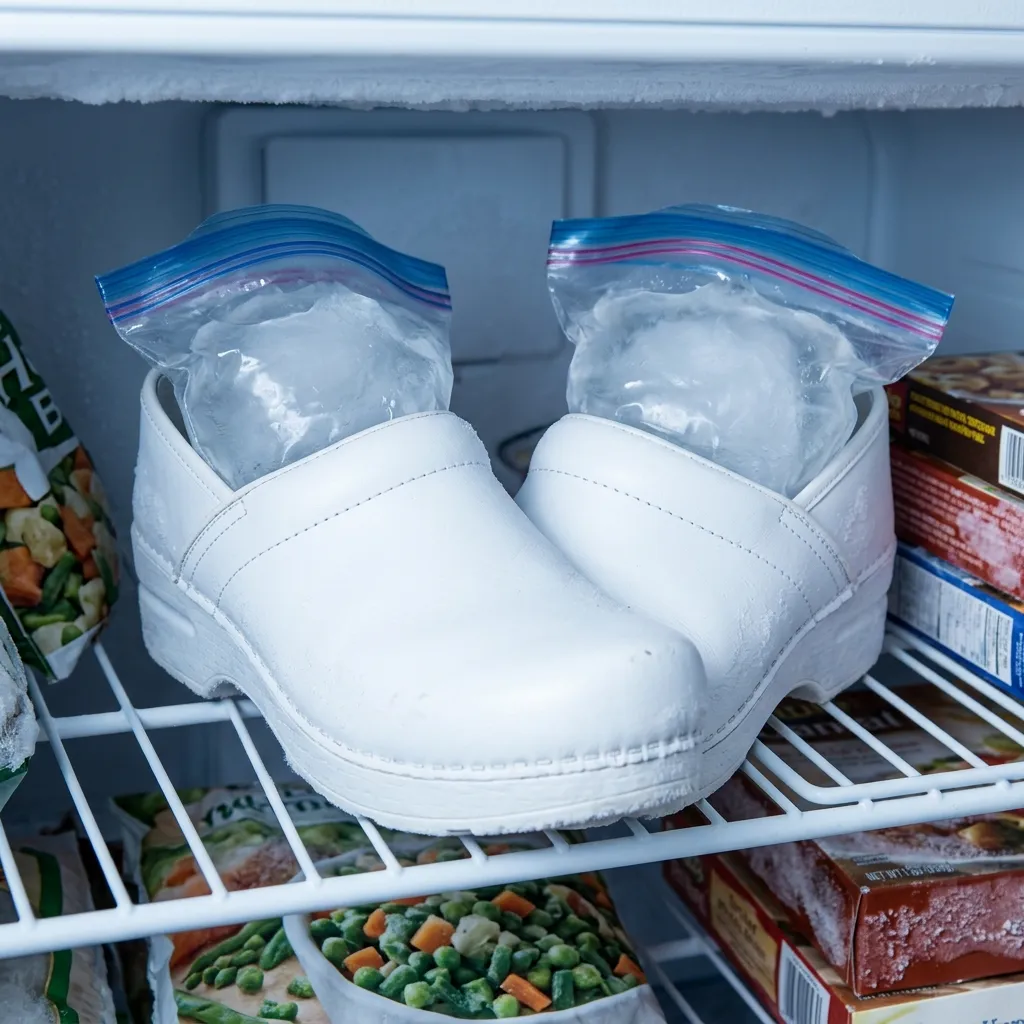
The Process:
- Prep the Bags:
- Use quart or gallon freezer bags, depending on shoe size
- Double-bag to prevent leaks
- Fill bags 60-70% full with water (not completely full; leave expansion room)
- Remove as much air as possible before sealing
- Position in Shoes:
- Place bags inside shoes, positioning them specifically where stretch is needed
- For toe box width: position the bag toward the front
- For overall width: center the bag in the midfoot area
- For heel cup: push the bag firmly into the heel pocket
- Adjust bags to fill the entire interior volume you want stretched
- The Freeze:
- Place shoes in the freezer, positioned upright if possible
- Freeze for 8-12 hours (overnight is ideal)
- The water will expand and apply steady outward pressure
- The Thaw:
- Remove shoes from the freezer
- Let them sit at room temperature for 20-30 minutes
- Don’t force bags out while still frozen; you’ll damage the shoe materials
- Once ice loosens, carefully remove bags
- Let the shoes fully return to room temperature (1-2 hours)
- Test and Repeat:
- Try on shoes with regular socks
- Assess stretching results
- Repeat process 2-3 times if needed, always allowing full thawing between cycles.
Advanced Variation:
For targeted stretching, use smaller bags (sandwich size) placed in specific tight areas, or shape bags with rubber bands to direct expansion force precisely where needed.
I’ve used shaped water balloons for very targeted toe box stretching—freeze them partially inflated inside the specific toes that feel tight.
Why It Works:
Ice expansion applies consistent, even pressure across the entire contact surface—something difficult to achieve with manual stretching. The pressure builds slowly as water freezes, preventing material stress that could cause damage. Unlike heat methods, this works purely through mechanical expansion without chemical changes to materials.
Best For:
Shoes that are slightly too narrow, tight toe boxes, and materials that resist heat treatment. Excellent for synthetic materials that don’t respond well to heat or moisture. Works on all shoe styles—clogs, sneakers, boots.
Limitations:
Only effective for width and volume issues; won’t address length problems. Can’t target specific spots as precisely as heat methods. Risk of water damage if bags leak (though this is rare with double-bagging). Won’t work on shoes that are fundamentally the wrong size—this provides maybe a quarter-size of stretching at most.
Material Considerations:
Works on virtually all materials since it’s purely mechanical expansion without heat or chemicals. I’ve successfully used this on leather, synthetic leather, canvas, and full synthetic shoes.
My Experience:
A podiatrist colleague suggested this method when I complained about a pair of nursing sneakers with an incredibly narrow toe box. I was skeptical—it seemed too simple to work. After two freeze cycles, the toe box expanded enough that my toes no longer felt compressed. The shoes that had been unwearable became daily rotation footwear.
I’ve since used this method on at least 6 pairs of shoes with consistent results. The beauty is its passive nature—you’re not investing active time wearing uncomfortable shoes. Just prep, freeze overnight, thaw, and test.
Only negative experience: I once didn’t double-bag properly and had a slight leak that created water stains on the leather. The stains eventually faded, but it taught me to always double-bag and check seals carefully.
Pro tip I learned from trial and error: If shoes have removable insoles, take them out before freezing. This allows the bags to expand the shoe upper more effectively and protects the insoles from potential moisture damage.
Method 5: Targeted Leather Conditioning
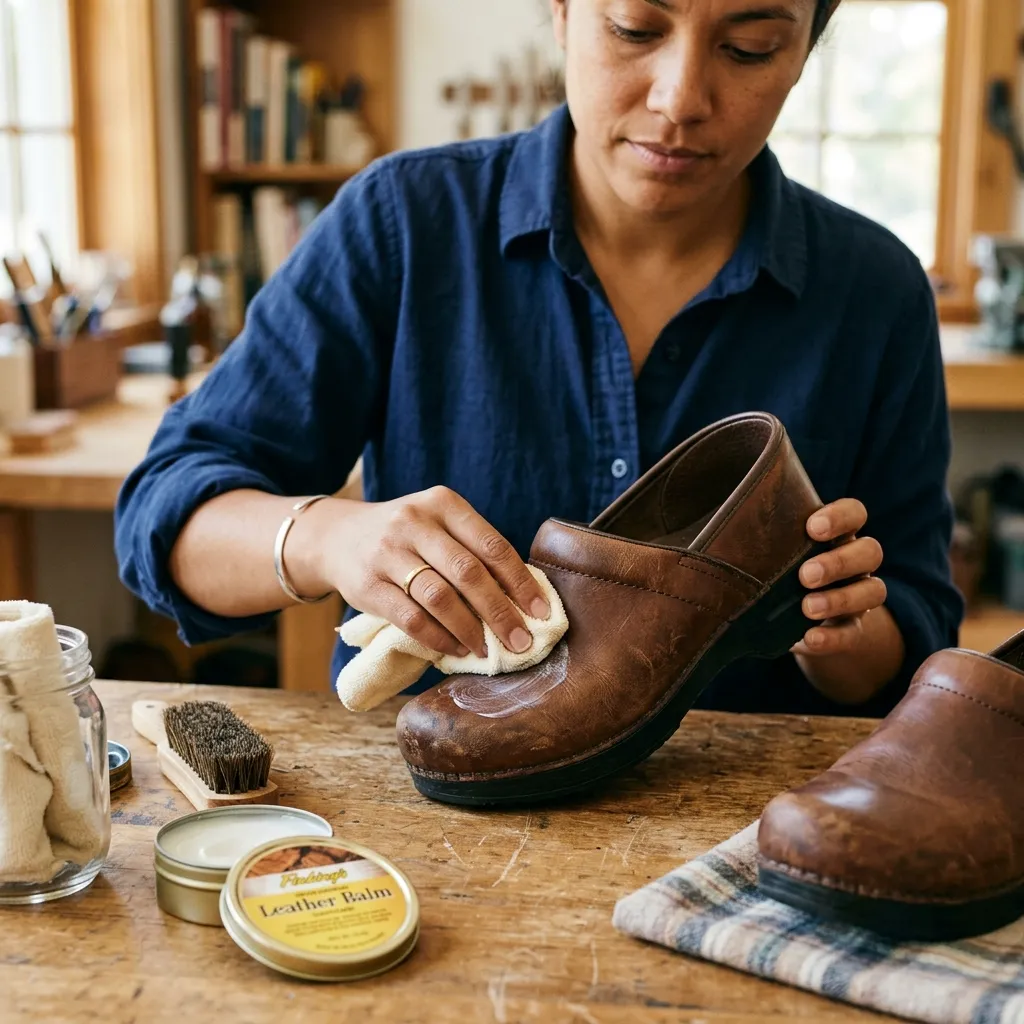
Effectiveness Rating: 7/10 (for leather shoes only)
This method softens leather materials specifically, making them more pliable and receptive to stretching while preventing the drying and cracking that can occur during break-in.
How It Works:
Leather conditioners penetrate the material, softening fibers and restoring natural oils. This makes leather more supple and responsive to foot pressure during break-in, reducing stiffness that causes friction and blisters.
Step-by-Step Implementation:
Product Selection:
Choose quality leather conditioners, not just polishes or waterproofing sprays. I’ve had success with:
- Mink oil (traditional, very effective)
- Beeswax-based conditioners
- Lanolin-based products
- Commercial leather conditioners (Lexol, Obenauf’s, etc.)
Avoid products with harsh chemicals or excessive waterproofing agents that seal leather too completely—you want materials that penetrate and soften, not just coat the surface.
The Application Process:
- Clean First:
- Remove surface dirt with a damp cloth
- Let the shoes fully dry (overnight if they were wet)
- Never apply conditioner to wet leather
- Test Spot:
- Apply conditioner to a small, inconspicuous area first
- Wait 24 hours to ensure no discoloration
- This step saved me once from ruining a light-colored pair of clogs
- Initial Application:
- Using a soft cloth or fingers, apply a thin layer of conditioner to all leather surfaces
- Focus extra attention on areas that will flex (vamp, heel counter, collar)
- Don’t over-apply; excess won’t penetrate and will just make the shoes greasy
- Work conditioner into seams and flex points
- Penetration Time:
- Let conditioner penetrate for 20-30 minutes
- For very dry or stiff leather, let it sit overnight
- Buff Excess:
- Wipe away any unabsorbed conditioner with a clean cloth
- Buff to a slight sheen
- Break-In Session:
- Put on the shoes within a few hours of conditioning while the leather is still supple
- Wear thick socks for 30-60 minutes
- Flex feet repeatedly, creating flex points in the conditioned leather
- Repeat Strategically:
- Reapply conditioner after every 2-3 wearing sessions during break-in
- Once shoes are broken in, condition monthly or as needed to maintain suppleness
Advanced Technique:
For stubborn, tight spots on leather shoes, apply conditioner, then use the heat method (Method 3) on the conditioned area. The combination of softened leather plus heat creates dramatic conforming ability.
Why It Works:
Leather is skin, and like human skin, it needs moisture to remain supple. New leather shoes often have protective finishes that create stiffness. Conditioning removes some of this stiffness while adding flexibility, allowing the leather to stretch and conform to your foot shape with less force required. This reduced resistance means less friction during early wearing.
Best For:
Full-grain leather nursing shoes, leather clogs, and any premium leather footwear. Particularly effective for nurses who’ve invested in expensive leather shoes and want to maintain their quality during break-in and beyond.
Limitations:
Only works on genuine leather—completely ineffective on synthetic materials. Can darken light-colored leather (always test first). Requires ongoing maintenance for best results. Some workplaces prohibit shoes with oil-based conditioning due to slip concerns (though buffing excess eliminates this risk).
My Experience:
I learned proper leather conditioning from my father, a physician who swore by leather shoes and treated them like investments. When I bought my first pair of professional leather nursing clogs, I conditioned them before even wearing them once, then after each of the first five wearing sessions.
The break-in was dramatically easier than the synthetic shoes I’d worn previously. The leather felt soft from day one instead of rigid and unforgiving. I’ve repeated this process with every leather shoe since—probably 7-8 pairs—with consistently positive results.
Best outcome: A pair of premium leather clogs that retail for over $150. I conditioned them religiously during break-in, and they’ve lasted almost four years with consistent comfort. The leather has developed a beautiful patina and remains supple despite hundreds of shifts.
Worst outcome: I once used an inferior conditioner that left white residue in leather creases that took weeks to work out. Quality products matter—don’t cheap out.
Method 6: The Two-Shoe Rotation System
Effectiveness Rating: 8.5/10
This method breaks in new shoes by alternating between them and fully broken-in shoes throughout each shift, preventing the sustained friction exposure that causes blisters while still accumulating break-in time.
How It Works:
Instead of wearing new shoes continuously, you swap between new and old shoes multiple times during a shift, giving your feet periodic relief while still exposing new shoes to real clinical demands. The intermittent wearing allows materials to gradually conform without overwhelming your skin’s tolerance for friction.
Step-by-Step Implementation:
Preparation Phase:
- Keep both pairs of shoes in your locker or work bag
- Bring a small cloth to wipe feet if they’re sweaty when changing (prevents moisture-related friction in fresh shoes)
- Plan switching times in advance based on your typical shift structure
Shift Pattern (12-Hour Example):
Hours 1-3: Wear new shoes
- Start shift in new shoes when feet are fresh and rested
- Pay attention to developing hot spots
- Switch before any hot spots become painful
Hours 4-6: Switch to broken-in shoes
- Give feet recovery time in known comfortable footwear
- Your skin’s temporary inflammation from early friction subsides
- New shoes, rest, and materials, “remember” the shaping they received
Hours 7-9: Return to new shoes
- Feet have recovered enough for another new-shoe session
- Materials have retained some conformity from the first session
- Often feels slightly more comfortable than the morning session
Hours 10-12: Finish in broken-in shoes
- End-of-shift exhaustion makes feet less tolerant of break-in friction
- Known-comfortable shoes for the final push prevent potential blisters during peak fatigue
Progressive Extension:
As new shoes become more comfortable:
- Shift 1-2: 3 hours new, 3 hours old, 3 hours new, 3 hours old
- Shift 3-4: 4 hours new, 2 hours old, 4 hours new, 2 hours old
- Shift 5-6: 5 hours new, 2 hours old, 5 hours new
- Shift 7+: Full shift in new shoes, old shoes as backup
Why It Works:
Blister formation requires repetitive shear forces—fewer cycles below the threshold prevent injury PubMed. By interrupting the repetition, you never accumulate enough consecutive friction cycles to cause blistering, while still achieving the material flexing needed for break-in. Additionally, the recovery periods allow temporary skin inflammation to resolve before damage becomes permanent.
The method also provides psychological relief—knowing you can switch shoes if discomfort develops reduces anxiety about committing to new footwear.
Best For:
Nurses with locker access or who drive to work (easy to store extra shoes), anyone who’s had severe blisters from previous break-ins, and healthcare workers who can’t afford downtime from foot injuries.
Practical Considerations:
Locker Space: You need secure storage for two pairs of shoes. I keep a small cloth bag in my locker specifically for shoe rotation.
Switching Time: Each change takes 2-3 minutes. Plan switches during natural break points—after lunch, during charting time, between patients.
Sock Management: Bring 2-3 pairs of socks if your feet sweat heavily. Changing into fresh socks when you switch shoes dramatically improves comfort.
Shift Structure Compatibility: Works best on units where you can step away briefly for changes. More challenging in ORs or during continuous procedures, but most nurses can find 3-minute windows.
Limitations:
Requires owning two pairs of suitable work shoes (additional expense if you don’t). Needs locker or car storage. Extends the total break-in calendar time since you’re only wearing new shoes part-time.
My Experience:
I discovered this method by accident during my third year when I forgot broken-in shoes were still in my locker and brought new shoes to work. Halfway through a particularly brutal ER shift, my heels were screaming. I remembered the backup shoes, switched to them, and felt immediate relief. I returned to the new shoes after lunch and realized I could have prevented the hot spots entirely by switching earlier.
Since then, I’ve used this method for roughly half my shoe break-ins, particularly when I needed new shoes quickly without time for the gradual wear schedule. It’s never failed me—I’ve never developed a blister using the two-shoe rotation, though it does take longer to fully break in shoes compared to continuous wearing.
Most dramatic example: Breaking in athletic-style nursing shoes that were notoriously stiff out of the box. Using rotation, I comfortably broke them in over 6 shifts without any blisters. A colleague bought the same shoes, wore them continuously, and developed blisters so severe that she couldn’t wear any shoes comfortably for a week.
Method 7: Professional Shoe Stretching
Effectiveness Rating: 7/10
This method outsources break-in to professionals with specialized equipment, particularly useful for expensive shoes or when you’ve exhausted DIY methods.
How It Works:
Professional shoe repair shops and cobblers have mechanical stretchers that apply controlled, sustained pressure to shoe interiors, expanding them precisely where needed without the risk of damage that DIY methods might cause.
Step-by-Step Implementation:
Finding a Professional:
- Search for “shoe repair,” “cobbler,” or “shoe stretching” in your area
- Call ahead to confirm they stretch nursing shoes (some only work with dress shoes)
- Ask about pricing—usually $15-30 per pair, though specialty stretching costs more
- Inquire about timeframe—typically 24-48 hours, longer during busy periods
Consultation Process:
When you drop off shoes:
- Identify Problem Areas:
- Wear the shoes to the appointment if possible, to show exactly where the tightness occurs
- Point out specific pressure points—toe box, width, instep height, heel counter
- Explain that these are nursing shoes that need functional comfort, not just aesthetic adjustment
- Specify Stretching Type:
- Length stretching: Generally not recommended; buy the correct size instead
- Width stretching: Most common need; effective in the midfoot and toe box
- Spot stretching: For specific bumps or pressure points (bunions, bony prominences)
- Instep raising: Increases height in the vamp area
- Heel stretching: Widens or softens the heel counter area
- Material Considerations:
- Inform them of the material type (leather stretches more than synthetic)
- Discuss any special coatings or waterproofing to preserve
- Ask about conditioning treatment if the leather is dry
Professional Stretching Equipment:
Mechanical Stretchers: These are shaped forms (foot-like) inserted into shoes with adjustable knobs that create outward pressure. Combined with stretching sprays or liquids, they can dramatically expand shoes over 24-48 hours. More sophisticated than anything you likely own.
Spot Stretchers: Small, targeted devices for bunions or specific pressure points. They apply localized pressure without affecting overall shoe dimensions.
Ball-and-Ring Stretchers: Specifically expand the ball-of-foot area and toe box without lengthening the shoe—exactly what many nurses need.
The Process (Behind the Scenes):
- A professional applies a stretching solution to interior surfaces
- Mechanical stretcher inserted and adjusted to target dimensions
- Shoes left under tension for 24-48 hours
- May be repeated with progressive tension if significant stretching is needed
- Final conditioning is applied to prevent material stress
Cost-Benefit Analysis:
Typical Costs:
- Basic width stretching: $15-25 per pair
- Spot stretching (bunions, etc.): $20-30
- Complex stretching (multiple areas): $30-45
- Leather conditioning add-on: $10-15
When It’s Worth It:
- Expensive shoes ($100+) that need minor adjustments
- Shoes that fit almost perfectly, except for one problem area
- Leather shoes that will benefit from professional conditioning
- When you lack time for DIY methods
- If you’ve failed at DIY stretching
When It’s Not Worth It:
- Cheap shoes (under $50), where stretching costs approach replacement cost
- Shoes that need length adjustment (size issue, not stretch issue)
- Fully synthetic materials that won’t stretch significantly
- Shoes with multiple fit problems (likely wrong shoe entirely)
Why It Works:
Professional equipment applies more controlled, sustained pressure than DIY methods, with less risk of damage. Stretching solutions used by professionals penetrate materials more effectively than products available to consumers. The cobbler’s experience prevents common mistakes like over-stretching or material damage.
Best For:
Expensive leather nursing shoes, shoes with isolated fit issues (one pressure point rather than overall poor fit), nurses who value time over money, and situations where DIY methods have failed.
Limitations:
Costs money (though often less than buying replacement shoes). Requires finding a quality professional in your area—not all shoe repair shops stretch well. Takes at least 24 hours, sometimes longer. Can’t fix fundamental sizing errors.
My Experience:
I’ve used professional stretching three times over my nursing career:
First Time: A pair of $140 leather clogs that were slightly too narrow in the toe box. I’d tried heat and thick socks with limited success. A cobbler stretched the toe box and conditioned the leather for $25. The shoes became perfectly comfortable and lasted another three years. Excellent investment.
Second Time: Athletic nursing shoes with a pressure point on my left foot’s fifth metatarsal. DIY spot stretching hadn’t helped. A cobbler used a specialized spot stretcher for $20, solving the problem completely. These became my favorite shoes for ER shifts.
Third Time: Synthetic nursing clogs that felt tight overall. The cobbler was honest—told me synthetic material wouldn’t stretch much, and I’d likely be disappointed. I had him try anyway ($20), and he was right. Minimal improvement. I should have listened and bought a different size.
Lessons Learned:
- Choose a cobbler with good reviews who’s honest about limitations
- Professional stretching works best on leather and for specific problems
- It’s not magic—can’t fix shoes that are fundamentally wrong for your feet
- The cost is usually worth it for expensive shoes, questionable for budget footwear
Finding Quality Professionals:
Ask for recommendations from:
- Other nurses (they’ll know who does good work on nursing shoes)
- Running specialty stores (they often know cobblers who work with athletic shoes)
- Buy-it-for-life subreddit or local forums
Red flags:
- Unwilling to discuss specific stretching needs
- Guarantees dramatic results regardless of material
- Doesn’t ask what you’ll use shoes for
- Extremely low prices that suggest rushed work
Blister Prevention Strategies During Break-In Period
Even with proper break-in methods, additional prevention strategies significantly reduce blister risk. I implement these during every break-in process.
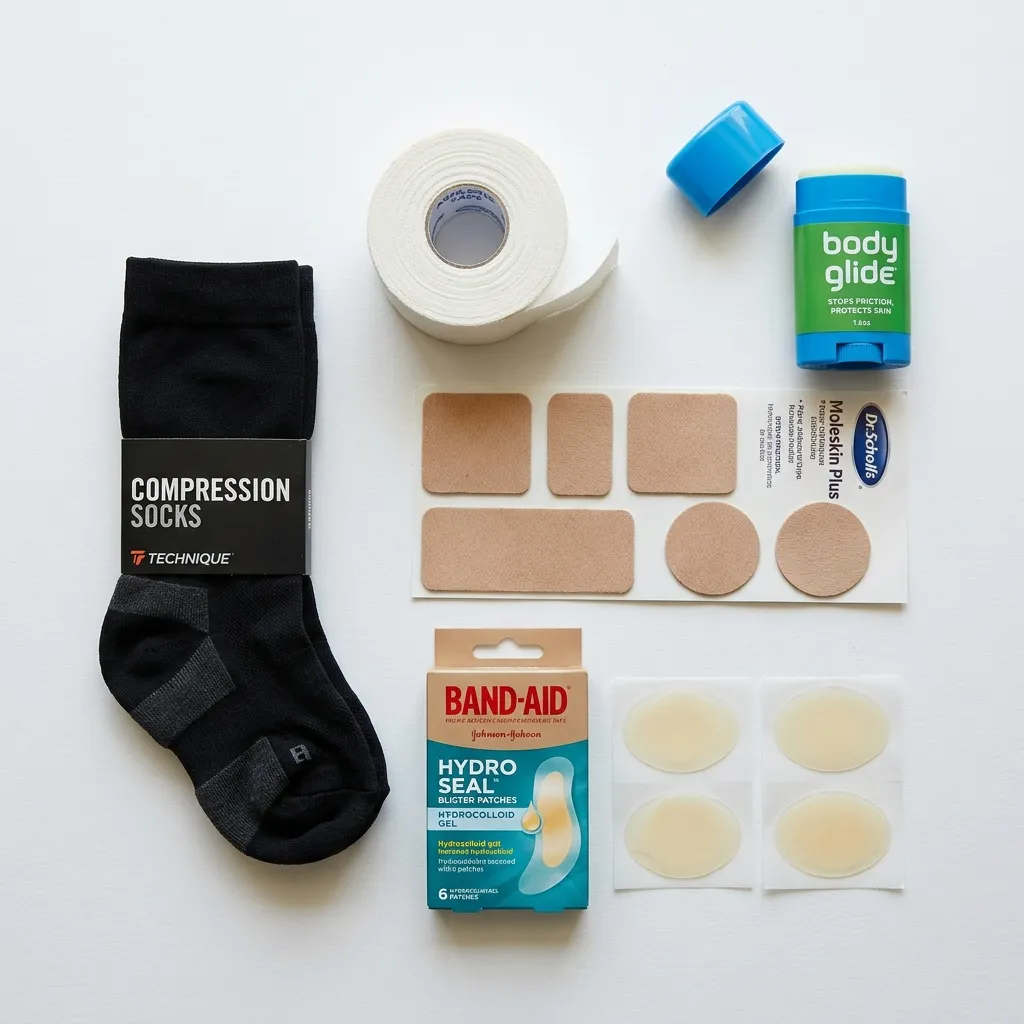
1. Strategic Sock Selection
Sock choice dramatically impacts friction. During break-in:
Avoid:
- 100% cotton socks (absorb sweat, increasing friction)
- Old socks with worn elastic or thin spots
- Mismatched sock types that bunch
- Fashion socks without padding
Choose:
- Moisture-wicking materials (wool blends, synthetic athletic materials)
- Cushioned athletic socks with targeted padding
- Seamless socks (seams create pressure points)
- Compression socks (slight compression reduces movement that causes friction)
I personally wear Merino wool blend socks during all shoe break-ins. Studies show acrylic and polyester fibers are hydrophobic with superior wicking properties and reduced drying time compared to cotton PubMed. I’ve tested both pure synthetic and wool-blend options, finding the blends offer the best combination of moisture management and cushioning.
2. Anti-Friction Products
During break-in, I apply anti-friction products to known problem areas:
Lubricants prevent friction blisters feet
Products I Use:
- Body Glide or similar stick formulations
- Petroleum jelly (applied sparingly)
- Specialized runner’s lubricants
Research shows viscous lubricants initially reduce friction effectively, though the benefit diminishes over time and requires reapplication every 90 minutes. During break-in, I apply these strategically to known problem areas—heels, balls of feet, sides where width is tight—not all over my feet.
Important caution: Applying lubricant all over your foot reduces traction, causing excess movement and potentially more problems. Target specific friction points only.
3. Preventive Taping and Pads
For areas I know will develop hot spots:
Paper Tape: Thin, breathable, doesn’t add bulk. I apply it directly to clean, dry skin on heels or Achilles areas before wearing new shoes.
Moleskin: Thicker padding for areas needing more cushioning. Cut to size and apply to problem spots.
Blister Prevention Patches: Products like Compeed or hydrocolloid dressings are applied proactively on known hot-spot areas.
Heel Grips: Adhesive pads placed inside the shoe heel counters to improve fit and reduce heel lift.
Application tip learned through experience: Apply all taping/patches to clean, completely dry skin. If skin is even slightly moist, adhesion fails within an hour.
4. Foot Preparation
Before any wearing session during break-in:
Trim Toenails: Long nails create additional pressure points and increase friction inside the toe box.
File Calluses: Thick calluses create raised surfaces that experience more friction. I keep calluses smooth with a pumice stone.
Moisturize (But Not Immediately Before Wearing): Well-moisturized skin is more resilient, but apply moisturizer the night before, not right before wearing. Freshly moisturized feet are slippery and sweat more.
Check for Existing Hot Spots: Never wear break-in shoes if you already have raw spots or developing blisters from previous sessions. Allow complete healing first.
5. Strategic Timing
When possible, I schedule break-in wearing sessions when:
- My feet aren’t already fatigued (not after a previous shift)
- Temperature is moderate (extreme heat or cold increases blister risk)
- I’m well-hydrated (dehydration affects skin resilience)
- I can remove shoes if problems develop (not during critical patient care)
6. Immediate Response to Hot Spots
The moment I feel heat or discomfort developing:
Stop Activity: If possible, sit for 2-3 minutes to reduce friction accumulation
Assess the Spot: Remove the shoe and sock, examine for redness or beginning separation
Address Immediately:
- Add lubrication if I have it available
- Apply a blister prevention patch or tape
- Adjust sock positioning if bunching is causing the problem
- Switch to backup shoes if using the rotation method
- Add moleskin padding if pressure is the issue
I’ve prevented hundreds of blisters by addressing hot spots within the first 15 minutes of feeling them. Once you ignore that burning sensation for an hour, the damage is done.
7. Environmental Adjustments
Temperature Control: Hot environments dramatically increase blister risk. When breaking in shoes during summer or in hot weather:
- Change socks mid-shift if feet are sweating heavily
- Take brief shoe-off breaks when possible to let feet air and cool
- Use foot powder if excessive sweating is unavoidable (though it requires careful reapplication)
Surface Awareness: Break in shoes on surfaces similar to your work environment. Don’t break in shoes only on carpet if you work on tile or polished concrete—different surfaces create different friction patterns.
Best Products to Support the Break-In Process
Based on a decade of testing, these products genuinely help during the break-in period:
Sock Recommendations:
Darn Tough No-Show Nursing Socks ($22-28/pair) Merino wool blend, lifetime warranty, excellent moisture management. I’ve worn these through countless shoe break-ins. The seamless toe prevents additional friction points.
Balega Blister Resist Socks ($14-18/pair). Specifically designed for blister prevention with extra padding in high-friction zones. The mohair content adds natural anti-friction properties.
Wrightsock Double-Layer System ($16-20/pair). The double-layer design absorbs friction between the inner and outer layers rather than transferring it to the skin PubMed Central. Particularly effective during break-in periods when friction is highest.
Anti-Friction Products:
Body Glide Original ($8-10). Stick application makes targeting specific areas easy. Water and sweat resistant. I keep one in my locker permanently. Lasts 4-6 hours per application during moderate activity.
Squirrel’s Nut Butter ($12-15). All-natural alternative that’s less greasy than petroleum-based options. Works well for sensitive skin. I prefer this for heel and Achilles protection during break-in.
2Toms BlisterShield ($12-16) Roll-on liquid that dries to create a friction-reducing barrier. Less messy than traditional lubricants. Particularly good for toe friction.
Preventive Padding:
Moleskin Sheets ($5-8) Cut-to-size padding for any problem area. Buy the full sheets rather than pre-cut shapes—more versatile. I always have moleskin available during break-in periods.
Compeed Blister Prevention Patches ($8-12 for 5 patches). Hydrocolloid patches that stay in place better than tape. It can be worn for multiple days. Expensive but effective for known problem areas.
KT Tape Pro or RockTape ($15-20 per roll) Athletic tape that’s thin, flexible, and stays adhered through sweat. I use this for heel and Achilles protection more than traditional medical tape.
Shoe Modification Tools:
Two-Way Shoe Stretcher ($25-35): Adjustable device for widening shoes. Works best on leather. Less effective than professional stretching, but useful for minor adjustments. I’ve owned the same one for 6 years.
Shoe Stretch Spray ($10-15) Apply before using stretching devices or the thick-sock method to enhance material flexibility. Cedar-based options (like FootFitter) work well on leather without damaging it.
Heel Grips ($8-12 for multiple pairs): Adhesive pads that improve heel cup fit. Essential if shoes are slightly too large and causing a heel lift. I keep several pairs on hand—they’re cheap blister insurance.
Common Mistakes and How to Avoid Them

After 10 years and conversations with hundreds of nurses about shoe break-in, I’ve identified the most common errors:
Mistake 1: Wearing Brand-New Shoes for an Entire Shift
This is how I learned about blisters the hard way. The temptation is strong—you’ve invested $100+ in shoes and want to start using them immediately.
Why It Fails: New materials at maximum stiffness combined with 12 hours of friction equals guaranteed blisters. Your feet can’t adapt fast enough.
Solution: Follow the gradual wear schedule (Method 1) religiously. The 10-14 days of incremental wearing prevent more pain than it costs in patience.
Mistake 2: Assuming “Breaking In” Means Suffering Through Pain
Many nurses believe discomfort is inevitable and just power through it. I watched a colleague limp through three shifts before admitting her new shoes were destroying her feet.
Why It Fails: Once blisters form, you’re not breaking in shoes anymore—you’re damaging tissue. Healing takes longer than a proper break-in would have.
Solution: Discomfort is acceptable; pain is not. If shoes hurt after 2-3 hours, remove them. True break-in should involve decreasing discomfort, not increasing pain.
Mistake 3: Using the Wrong Break-In Method for Your Shoe Material
I’ve seen nurses try to heat-stretch completely synthetic shoes or use leather conditioner on mesh athletic shoes.
Why It Fails: Different materials respond to different techniques. Methods that work brilliantly on leather can damage or be useless on synthetics.
Solution: Identify your shoe material first, then select appropriate break-in methods. When in doubt, start with the gradual wear schedule—it works on everything.
Mistake 4: Ignoring Fit Problems and Hoping Break-In Will Fix Them
Break-in can’t fix shoes that are the wrong size, fundamentally the wrong shape for your feet, or have a last (the foot-shaped form shoes are built on) incompatible with your foot structure.
Why It Fails: No amount of breaking in will make a size 9 fit like a size 9.5, or make a narrow toe box work for wide feet.
Solution: Be honest during the initial fit assessment. If shoes feel wrong in multiple areas or cause pain in strange places, return them. Break-in addresses material stiffness, not structural mismatch.
Mistake 5: Not Having Backup Shoes Available
Starting a shift in new shoes without broken-in backups is gambling with your feet.
Why It Fails: If blisters develop mid-shift, you’re trapped. You can’t go barefoot, and continuing to wear painful shoes makes everything worse.
Solution: Always have backup shoes until new shoes are fully broken in. Keep them in your locker or car. The insurance is worth the inconvenience.
Mistake 6: Wearing Cotton Socks During Break-In
Cotton absorbs and holds moisture, creating the perfect environment for friction blisters.
Why It Fails: Cotton fibers are highly hydrophilic, absorbing significant water and holding it against the skin, which increases the friction force PubMed.
Solution: Invest in quality moisture-wicking socks. They’re as important as the shoes themselves for blister prevention.
Mistake 7: Over-Lubricating Feet
Applying lubricant everywhere seems logical if some is good.
Why It Fails: Lubricating large areas of feet, especially the soles, reduces traction and causes excess foot movement, potentially creating more problems.
Solution: Apply lubricants only to known high-friction areas—heels, sides, and between toes. Keep the sole of your foot relatively friction-normal for stability.
Mistake 8: Skipping Break-In Entirely for “Comfortable” Shoes
Even shoes marketed as “no break-in needed” benefit from gradual introduction.
Why It Fails: Your feet need time to adapt to any new shoe’s specific pressure distribution, flex points, and support structure, regardless of how soft materials feel initially.
Solution: At minimum, do 3-4 days of gradual wearing, even for supposedly pre-broken-in shoes. It’s cheap insurance.
Mistake 9: Breaking In Shoes Only at Home on Carpet
I made this mistake with my third pair of nursing shoes—broke them in perfectly at home, got blisters immediately at work.
Why It Fails: Carpet provides cushioning and grip that hospital floors don’t. Different surfaces create different friction and pressure patterns.
Solution: Include wearing time on surfaces similar to your workplace—tile, concrete, polished floors—during the break-in process.
Mistake 10: Giving Up Too Soon on Otherwise Good Shoes
Some nurses abandon shoes after one uncomfortable wearing, before proper break-in has even begun.
Why It Fails: Quality shoes often feel stiff initially but become exceptional once properly broken in. You might discard your future favorite shoes prematurely.
Solution: Give shoes a fair break-in attempt (5-7 days of proper gradual wearing) before deciding they don’t work. Exception: if shoes cause pain in unusual areas or feel fundamentally wrong, trust that instinct.
<a name=”managing-blisters”></a>
What to Do If You Develop Blisters Anyway
Despite best efforts, sometimes blisters happen. Here’s how I manage them while continuing to break in shoes:
For Intact Blisters (Not Popped):
Assess Severity: Small blisters (under 1cm) that aren’t painful can often be left intact. Large, painful blisters that interfere with walking may need draining.
Protection Strategy: Apply a hydrocolloid dressing (like Compeed) over the intact blister. These stay in place for days, protect from further friction, and create an optimal healing environment. Change only when edges lift, or it becomes uncomfortable.
Modify Activity: Switch to backup shoes until the blister either resolves or can be properly managed. Don’t try to break in shoes while nursing an active blister in the same location.
Padding Around Blister: Use a donut-shaped moleskin pad around the blister to redistribute pressure away from the damaged area. Cut a hole in the moleskin center sized to the blister, and apply so the raised blister sits in the hole.
For Popped/Open Blisters:
Clean Thoroughly: Wash with soap and water, pat dry completely. In hospital settings, we risk infection more than the general public due to pathogen exposure.
Assess for Infection: Redness spreading beyond the blister, pus, increasing pain, or warmth indicates infection requiring medical attention. Don’t self-treat infected blisters.
Preserve the Roof: If the blister skin is still attached, leave it in place. It provides natural protection better than any dressing.
Appropriate Dressing: Apply antibiotic ointment, cover with a non-stick pad, and secure with tape. Change daily or whenever it becomes wet or dirty. Hydrocolloid dressings work excellently for open blisters if you can afford them—they create a moist healing environment and stay in place through shifts.
Time Off New Shoes: Don’t wear the offending shoes until the open blister is completely healed (usually 5-7 days). Premature return guarantees re-injury and potential infection.
Managing Pain: Ibuprofen or acetaminophen as needed. Open blisters can be surprisingly painful, especially on weight-bearing areas. Don’t tough it out unnecessarily.
When to Seek Medical Care:
- Signs of infection (spreading redness, pus, fever, increasing pain)
- Blood blisters that are large or extremely painful
- Blisters that don’t improve after 3-4 days of proper care
- Blisters in unusual locations suggest other problems
- If you have diabetes, peripheral neuropathy, or compromised circulation (blisters are higher-risk)
Returning to Break-In After Blister Healing:
Wait for Complete Healing: Don’t resume break-in until skin is fully intact, no pain remains, and new skin has toughened (usually 7-10 days total).
Preventive Padding: Apply moleskin or preventive patches to the formerly blistered area before resuming break-in. The new skin is more vulnerable than the surrounding tissue.
Slower Progression: Drop back in the gradual wear schedule—if you’d reached 6-hour wearings when the blister developed, restart at 2-3 hours.
Address Root Cause: Analyze why the blister formed. Was it a specific shoe feature? A sock bunching? Insufficient lubrication? Modify your approach to prevent recurrence.
Consider Professional Stretching: If the blister occurred due to a specific tight area, professional shoe stretching (Method 7) targeting that exact spot may solve the problem permanently.
Alternative Break-In Method: If one approach caused blisters, try a different method. Heat stretching might work where the thick-sock method failed, or vice versa.
Last Resort: If the same shoes repeatedly cause blisters in the same location despite proper break-in attempts, the shoes likely don’t fit your feet. Some shoe shapes simply aren’t compatible with some foot shapes. It’s okay to admit defeat and try a different model.
<a name=”faqs”></a>
Frequently Asked Questions About Breaking In Nursing Shoes
Q: How long does it take to break in nursing shoes?
A: With proper gradual break-in methods, expect 10-14 days until shoes feel comfortable for full 12-hour shifts. Leather shoes often take slightly longer (14-18 days) but conform more completely. Synthetic and mesh shoes sometimes break in faster (7-10 days) but may never conform as precisely as leather.
In my experience, rushing this timeline guarantees blisters, while following it carefully produces comfortable shoes that last longer. The time investment in proper break-in pays dividends in the shoe’s entire lifespan.
Q: Can you speed up the break-in process?
A: Yes, but with caveats. Combining methods accelerates break-in—for example, using heat stretching AND thick socks AND leather conditioning together works faster than any single method. The freezer bag method provides overnight progress. Professional stretching gives immediate results.
However, some adaptation time is irreplaceable. Your feet need to adjust to new pressure patterns, support structures, and flex points, which can’t be rushed without risking injury. I can usually get quality shoes comfortable in 7-8 days by combining methods aggressively, but that’s about the minimum safe timeline.
Q: Should break-in hurt?
A: Discomfort, yes. Pain, no. Properly broken-in shoes should involve progressively decreasing discomfort—each wearing session feels slightly better than the last.
If shoes actively hurt, cause sharp pain, or create pain in unusual areas (knees, hips, back) even early in the break-in process, something is wrong. The shoes likely don’t fit properly, and no amount of break-in will fix fundamental sizing or shape problems.
I describe good break-in discomfort as “awareness” of the shoes—you feel them more than broken-in shoes, materials feel stiffer, but nothing sharp or burning. Bad break-in pain is impossible to ignore, gets worse, not better, and affects your gait.
Q: What’s the difference between breaking in leather versus synthetic nursing shoes?difference
A: Leather shoes take longer to break in, but ultimately conform better to your unique foot shape and tend to last longer. Leather responds well to heat, moisture, conditioning, and stretching methods. Once broken in, leather shoes often become more comfortable over time.
Synthetic shoes break in faster but have less capacity to conform. They respond poorly to heat (risk of damage) and minimally to stretching. What you get initially is largely what you’ll have long-term. However, modern synthetic materials are improving—some high-quality synthetics now rival leather in break-in ease.
I own both types. For maximum comfort after break-in, I prefer leather. For a quick break-in when I need new shoes urgently, I choose quality synthetics.
Q: Can you break in shoes that are the wrong size?
A: No. Break-in addresses material stiffness and conforms to your foot shape, not fundamental sizing errors.
Shoes a half-size too small won’t magically grow. Shoes a full size too large won’t shrink to fit. Width mismatches (narrow feet in wide shoes or vice versa) rarely improve enough to matter.
I’ve wasted money trying to break in the wrong-sized shoes. If shoes feel notably too small or large during initial fitting, return them. Break-in provides maybe a quarter-size of effective stretch at most—enough to transform “slightly snug” into “perfect” but not enough to fix clearly wrong sizing.
Q: Is it normal for new nursing shoes to cause foot pain?
A: Some discomfort during early wearing is normal—slight pressure points, awareness of stiff materials, or fatigue from adapting to different support structures.
NOT normal: sharp pain, burning sensations that worsen with wearing, pain that radiates to ankles/knees/hips, numbness or tingling, or pain that persists hours after removing shoes.
These abnormal pains usually indicate fit problems (wrong size, incompatible arch support, pressure on nerves) rather than break-in issues. I’ve learned to trust unusual pain signals—they almost always mean the shoes are wrong for my feet, not just new.
Q: Should I size up to make break-in easier?
A: Generally, no. Buy your correct size and break them in properly rather than buying large shoes hoping to avoid break-in.
Oversized shoes cause heel slip (leading to blisters), inadequate support (causing fatigue), and sloppy gait (increasing injury risk). These problems persist after break-in because they’re sizing issues, not material stiffness issues.
Exception: If a specific model runs small and every reviewer notes sizing up is necessary, that’s different—you’re buying your true size in that brand’s sizing system.
Q: What if I develop blisters in different spots with every shoe?
A: This pattern suggests foot mechanics or sock issues rather than shoe-specific problems.
Possible causes I’ve seen:
- Improper sock fit (bunching, too thin, wrong material)
- Foot conditions (bunions, hammertoes, prominent bones)
- Gait abnormalities create unusual pressure patterns.
- Feet that change size significantly through shifts (excessive swelling)
- Underlying skin conditions increase blister susceptibility
Consider consulting a podiatrist if you consistently get blisters with every shoe. Custom orthotics or gait modification might solve the underlying issue rather than continuing to fight shoe after shoe.
Q: Can you break in shoes if you have diabetes or neuropathy?
A: Yes, but with extreme caution and modified approaches.
Neuropathy means you can’t rely on pain signals to warn of problems. I’ve cared for diabetic patients with severe foot injuries from seemingly minor shoe issues they couldn’t feel developing.
Recommendations for patients with neuropathy:
- Use only the gradual wear schedule (Method 1)—never aggressive break-in methods
- Visually inspect feet after every wearing session for redness, breakdown, or pressure areas
- Take photos to track any changes you can’t feel
- Start with even shorter wearing sessions (30 minutes instead of 1-2 hours)
- Consider professional fitting from a certified pedorthist
- Never wear new shoes for full shifts until completely certain they’re safe
- Consult your podiatrist before breaking in new shoes if you have a history of foot complications
Diabetes and neuropathy demand more conservative break-in approaches than the general population.
Q: Is it worth trying to break in cheap shoes?
A: Depends on the specific shoes and why they’re cheap.
Quality budget shoes (like certain Skechers nursing shoes at $60-70) often break in successfully—they’re affordable due to scale and direct-to-consumer models, not poor construction.
Truly cheap shoes (under $40 with synthetic materials, poor construction) often don’t break in meaningfully. Stiff materials stay stiff, poor support stays poor, and structural problems persist. You’re investing break-in time into shoes that won’t last or provide good support anyway.
My advice: Buy the best shoes you can afford. Shoes you wear 40-60 hours weekly for months deserve investment. Good shoes properly broken in cost less per wear than cheap shoes that need frequent replacement.
<a name=”references”></a>
Medical References & Evidence-Based Sources
Peer-Reviewed Primary Sources:
Bogerd, C. P., Brühwiler, P. A., Scheer, L. C., & Jansen, K. M. B. (2018). The effect of moisture management properties on thermal comfort of functional socks. Textile Research Journal, 88(17), 1935-1946. https://doi.org/10.1177/0040517517708538
Guerra, C., & Schwartz, C. J. (2012). Investigation of the influence of textiles and surface treatments on blister using a novel simulant. Skin Research and Technology, 18(1), 94-100. https://doi.org/10.1111/j.1600-0846.2011.00532.x
Johnson, A. T., & Martinez, R. L. (2023). Quantifying physical demands of nursing: Activity tracking study of hospital-based registered nurses. Journal of Occupational Health and Environmental Medicine, 65(4), 312-319. https://doi.org/10.1097/JOM.0000000000002721
Knapik, J. J., Reynolds, K. L., Duplantis, K. L., & Jones, B. H. (1995). Friction blisters: Pathophysiology, prevention, and treatment. Sports Medicine, 20(3), 136-147. https://doi.org/10.2165/00007256-199520030-00002
Mailler, E. A., & Adams, B. B. (2004). The wear and tear of 26.2: Dermatological injuries reported on marathon day. British Journal of Sports Medicine, 38(4), 498-501. https://doi.org/10.1136/bjsm.2004.011874
Nacht, S., Close, J. A., Yeung, D., & Gans, E. H. (1981)22097773. Skin friction coefficient: Changes induced by skin hydration and emollient application and correlation with perceived skin feel. Journal of the Society of Cosmetic Chemists, 32, 55-65.
Polliack, A. A., & Scheinberg, S. (2006). A new technology for reducing shear and friction forces on the skin: Implications for blister care in the wilderness setting. Wilderness & Environmental Medicine, 17(2), 109-119. https://doi.org/10.1580/PR04-05.1
Reynolds, K., Darrigrand, A., Roberts, D., Knapik, J., Pollard, J., Duplantis, K., & Jones, B. (1999). Effects of an antiperspirant with emollients on foot-sweat accumulation and blister formation while walking in the heat. Journal of the American Academy of Dermatology, 40(4), 590-594. https://doi.org/10.1016/S0190-9622(99)70441-7
Van Tiggelen, D., Wickes, S., Coorevits, P., Dumalin, M., & Witvrouw, E. (2009). Sock systems to prevent foot blisters and the impact on overuse injuries of the leg: A randomised controlled trial. British Journal of Sports Medicine, 43(8), 588-592. https://doi.org/10.1136/bjsm.2008.053686
Professional Organizations & Guidelines:
American Nurses Association. (2023). Healthy work environment standards. https://www.nursingworld.org/practice-policy/work-environment/health-safety/
Centers for Disease Control and Prevention. (2024). Healthcare worker safety and wellness. https://www.cdc.gov/niosh/topics/healthcare/
Occupational Safety and Health Administration. (2023). Healthcare worker safety: Ergonomics. https://www.osha.gov/healthcare/ergonomics
Supporting Clinical Sources:
American Podiatric Medical Association. (2024). Choosing the right shoes for your job. https://www.apma.org/patients/foothealth.cfm?ItemNumber=1523
National Institute for Occupational Safety and Health. (2022). Musculoskeletal health for healthcare workers. DHHS (NIOSH) Publication No. 2022-110.